


A Step-by-Step Guide for Building Your Gaming PC
A custom build gaming PC is the best in the world of gaming as it enables one to carefully configure their machine and optimise its performance. It is quite rewarding to build your gaming computer since you get full control of what goes into your rig and how much it will cost you in the end. Here is a step-by-step guide showing how to build the gaming PC of your dreams.
Step 1: Define Your Budget
Defining a gaming desktop budget is the first and most important thing to do. Decide what amount of money you are ready to part with for the core elements, such as processor (CPU), video card (GPU), RAM, and storage, as well as for the peripheral items like the monitor, keyboard, and mouse. It is important to have a specific budget that should not be exceeded and will affect the components you will choose for your system.
Step 2: Choose the Right Components
CPU (Central Processing Unit): Your PC’s “brain” is the CPU. The best thing you can do is choose a CPU, depending on your taste and budget, among AMD and Intel’s processors. Make sure that you have a suitable motherboard.
GPU (Graphics Processing Unit): It takes care of rendering graphics on your GPU. Numerous choices are coming from NVIDIA or AMD. Select one that will deal with the kind of games you need to play using the specified parameters.
Motherboard: Choose among those motherboards that fit your type of CPU and possess specific components. Note details such as the number of RAM ports, PCI slots, and connectivity ports.
RAM: At least sixteen GB of RAM is essential for gaming, although thirty-two GB will be ideal for highly demanding games or multitasking.
Storage: Your operating system and any frequently played games require you to install a fast SSD. For general storage, you may opt for a bigger Hard Disk Drive or an extra Solid State Drive.
Power Supply Unit (PSU): Make certain that your PSU will provide adequate power for all of your components, as well as some headroom for upgrades in the future.
Case: Choose the correct casing that is compatible with your components as well as optimise cooling through adequate air flow. Third, the cabinet has to facilitate proper cable management.
Cooling: Consider the cooling options needed; for instance, an additional fan may be required in the case of a processor whereas a graphics card may require a liquid cooling system.
Peripherals: Select peripherals: a gaming monitor, the keyboard and mouse you like, fitting to your taste and game style.
Step 3: Build Your Custom Build Gaming PC
Now that you have your components, it is time to put everything together. Here is a simplified step-by-step guide for the assembly process:
Prepare Your Workspace: Select a neat, brightly lit, and open room for working. Get your screwdrivers, cable ties, and other necessary tools ready.
Install the CPU and Cooler: Ensure that you are very keen while positioning your CPU into the motherboard before you proceed to attach your CPU cooler, as instructed by the manufacturer.
Install RAM and Motherboard: Push the RAM sticks into their appropriate slots so that they will fit in properly. Install a motherboard in the case while using screws to hold it firmly against the latter.
Connect Power Supply and Cables: Attach the PSU to the motherboard, GPU, and drives. Arrange your cables for better performance and looks.
Install GPU and Storage: Now slide your graphics card onto the PCIe slot, latch it up, and plug in the power cables. Connect the required cables and install your storage drivers.
Install Additional Components: Extra cooling fans, the addition of more RGB lighting, or even adding new expansion cards.
Cable Management: Neatly organise your cables, thereby enhancing better airflow as well as the aesthetics of your room. Locking tape should be used with cable ties for this purpose.
Test Your PC: Connect the basic parts of your PC like CPU, GPU, RAM, and power before completely assembling it to confirm that the system is switched on and you receive the necessary response in BIOS.
Install Operating System and Drivers: You have the option of installing your desired operating software, followed by the updated drivers from respective parts.
Step 4: Fine Tune and Optimise
Once you have a custom gaming PC running, the trick is to tune and optimise it for that ultimate experience.
Overclocking: If you are game for it, then go ahead and overclock your CPU & GPU for that extra kick.
Software and Updates: Your operating system, driver and client software should be updated as well. Get some essential services such as gaming launchers and monitoring tools.
Gaming Peripherals: According to your preference, please provide gaming macro, button or RGB lighting for the peripherals.
Cooling and Temperature Monitoring: Check the system temperature and do not push it over safe limits.
Conclusion
It is a very rewarding experience when you design your custom-built PC; you make a perfect machine for gaming with this method. Here, you will have the best gaming PC designed uniquely for you. So, roll up your sleeves and follow the following procedure on how to make a gaming computer from scratch, especially for you guys who want ace their games.
Posted 1 year agoComments
Latest Blogs
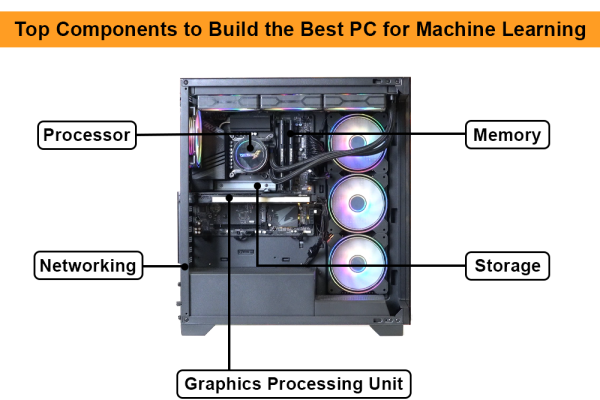
Top Components to Build the Best PC for Machine Learning Projects
Top Components to Build the Best PC for Machine Learning Projects
When it comes to building the best PC for machine learning, the right components can make all the...
Authored by: Armaan Posted at: 21 Jan 2025 .
View Post
Why Traders Are Switching to Custom PCs for 4 Screen Trading Setups
Why Traders Are Switching to Custom PCs for 4 Screen Trading Setups
In the fast-paced world of trading, every second counts. Traders rely on advanced tools and setup...
Authored by: Armaan Posted at: 21 Jan 2025 .
View Post
System Requirements for Artificial Intelligence in 2025
System Requirements for Artificial Intelligence in 2025
Artificial Intelligence (AI) continues to shape industries and redefine the boundaries of what&rs...
Authored by: Armaan Posted at: 21 Jan 2025 .
View Post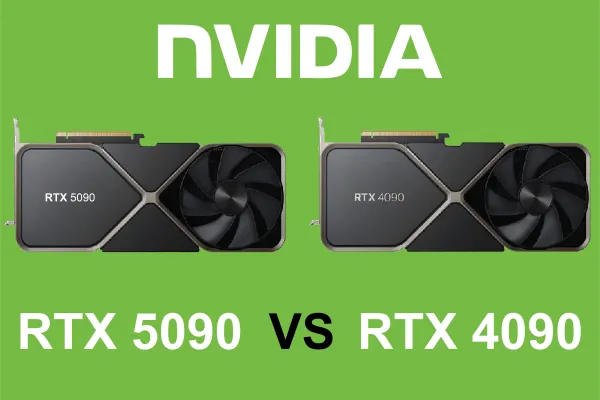
Nvidia GeForce RTX 5090 vs RTX 4090: A Detailed Comparison
Nvidia GeForce RTX 5090 vs RTX 4090: A Detailed Comparison
The Nvidia GeForce RTX 5090 has officially entered the gaming and professional graphics arena, pr...
Authored by: Armaan Posted at: 21 Jan 2025 .
View Post
Why Every Aspiring Data Scientist Needs a Dedicated Machine Learning PC
Why Every Aspiring Data Scientist Needs a Dedicated Machine Learning PC
In today’s data-driven world, data science is at the forefront of technological innovation....
Authored by: Armaan Posted at: 18 Nov 2024 .
View Post
Trading Technology: How to Choose the Best PC for Your Investment Needs
Trading Technology: How to Choose the Best PC for Your Investment Needs
In the fast-paced world of trading, every millisecond counts, and having a powerful, reliable, an...
Authored by: Armaan Posted at: 18 Nov 2024 .
View Post
How to Choose the Right Power Supply for Your PC
How to Choose the Right Power Supply for Your PC
Choosing the right power supply for your PC is essential for ensuring reliable performance, syste...
Authored by: Armaan Posted at: 18 Nov 2024 .
View Post
The AMD Ryzen 9 9950X and Ryzen 9 9900X Review: Flagship Zen 5 Soars - and Stalls
The AMD Ryzen 9 9950X and Ryzen 9 9900X Review: Flagship Zen 5 Soars - and Stalls
AMD has long been known for shaking up the processor market with its Ryzen series, offering incre...
Authored by: Armaan Posted at: 18 Nov 2024 .
View Post
The End of Windows 10 Support: What You Need to Know
The End of Windows 10 Support: What You Need to Know
In the ever-evolving landscape of technology, software updates and operating system (OS) upgrades...
Authored by: Armaan Posted at: 11 Nov 2024 .
View Post
Gaming PC Security: How to Protect Your System from Cyber Threats in 2024
Gaming PC Security: How to Protect Your System from Cyber Threats in 2024
1: Understanding Cyber Threats to Gaming PCs Introduction to the Rising Cyber Threats in Gamin...
Authored by: Armaan Posted at: 11 Nov 2024 .
View Post